Code-Along: Building Websites
In this activity, use HTML and CSS to create your own website!
Getting Started
To get everything setup, follow the steps below.
- Open up Microsoft Edge (or another web browser)
- Go to short.hyland.com/www
- This should redirect to hytop.onrender.com/e/www
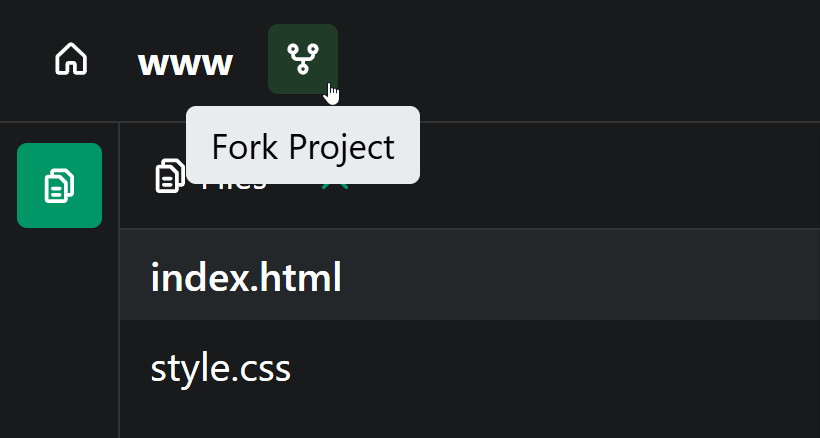
- Click the Fork button in the upper left
Now you have your own copy of a website to start editing!
First Challenge: Looking at the HTML
Make sure the index.html file is selected on the left to view the HTML code. Notice how the code in the HTML creates the text on the website. Everything in HTML goes between tags, which tell the website what type of element to display.
The first thing to do is update the header text with your name! For example, if my name were Sokka, I could change the header so that it said Sokka's Website.
Update the code in the HTML section, between the <h1> and </h1> tags. It should look something like this:
<h1>Sokka's Website</h1>
When you make a change, the preview should update automatically. If you see your name - that's it! You're officially a web developer!
Adding a Welcome Paragraph
Now it's time to add a totally new element. The paragraph element is used to display normal text on a webpage. Its tags are <p> and </p>, with text content between.
- Make a new line underneath the
<h1></h1> - Add a
<p>opening tag on the new line - Enter some text that will be displayed
- At the end of the line, add a
</p>to close the paragraph element - Run the code, and verify that the message appears on the website!
The code should look something like this:
<p>Hi, I'm me. Welcome to my website!</p>
Adding a List of Hobbies
Next, it's time to add some information about yourself. Think of some hobbies or activities you enjoy, and then follow the instructions to list them on your website!
- Add an
<h2></h2>saying "My Hobbies" beneath the<p></p>element- This will display a slightly smaller header than
h1
- This will display a slightly smaller header than
- On the next line, add a
<ul>opening tag, and make a new indented line- Can you guess what the
ulelement will be? An unordered list!
- Can you guess what the
- Under the
<ul>, add an<li></li>with one of your hobbies as the content- Can you guess what the
lielement will be? A list item!
- Can you guess what the
- Add at least one more
lielement on the next line - At the end of the list, add a
</ul>to complete the element - Run the code, and verify that the list appears on the website!
The code should look something like this:
<h2>My Hobbies</h2>
<ul>
    <li>Reading</li>
    <li>Writing</li>
    <li>Petting Cats</li>
</ul>
Adding a Cool Image
This is looking rad, but what's missing? Almost every website has at least one image, and yours can too!
Part One: Adding the Code
The first step is to add some code to the site to display an image, as well as a caption above it.
- Make a new line under the
</ul> - Add another
<h2>saying "A Cool Image" - Make a new line under that
- Start adding a new element:
<img - Instead of
>, add a space! - After the space, type in
src="" - After the
", add>
The code should look something like this:
<h2>A Cool Image</h2>
<img src="">
That's all the code, except it's missing one thing: the actual image we want to show!
Part Two: Finding an Image
Images on websites have URLs which tell the browser where to look for them. Follow the instructions below to find the URL (or address) of an image, and copy / paste it into the code!
- Open a new browser tab and go to somewhere like Google Images or Bing Images
- Search for something appropriate (such as "cats")
- Click on the image you would like to use
- When it appears, right click and select "Copy image link"
- Do not copy the image itself, that will not work!
- On Google Chrome, it will say "Copy image address"
Now, the image address is stored on the clipboard. Swap back to the code tab, and paste the URL right in between " and " (the double quotes):
<img src="https://upload.wikimedia.org/wikipedia/commons/5/53/Sheba1.JPG">
Save the project, and you should see an image appear!
Extra: Resizing
To resize an image, you can use another attribute just like the src attribute. It looks like this:
<img width="200px" src="...">
Changing the Background Color with CSS
Now the content of the page is looking pretty good, but it's not very stylish. One way to make the website look more fun and exciting is to use CSS! HTML is like the skeleton of a webpage, just the structure, and CSS is like the clothes that it wears, giving it style.
On the left side of the page, open the style.css file by clicking on it.
Take a look at the code so far. Try to figure out how to change the background color from white to another color, like pink!
The code should look something like this:
body {
  background: pink;
}
Changing More with CSS
CSS can change almost anything on a website. For this activity, update the text color, size, and font! All changes should take place in the style.css file.
Updating the Text Color
Follow these instructions to change the text color on your website.
- Find the line where the
backgroundcolor is set - Make a new line underneath that line (above the
}) - Type in
color, followed by a colon (:) - Make a space, and type in a new color (like
red) followed by a semi-colon (;)
Run the code, and verify that the text color changes!
Note that every CSS property follows the same structure: property name, colon, property value, semi-colon.
Updating Font and Size
Next, update the font and size of the text by following the instructions below.
- Make a new line under the
colorline (still above}) - Set a new property
font-familyto a value ofconsolas- property name, colon, property value, semi-colon
- Make another new line, still above
} - Set another new property
font-sizeto a value of18px- property name, colon, property value, semi-colon
- Can you guess what
pxmeans? Pixels!
Run the code, and verify that the text changes font and size! Feel free to try changing the numbers or the font to see what works.
The code should look something like this:
body {
  background: pink;
  color: red;
  font-family: consolas;
  font-size: 18px;
}
Finishing Up
Hopefully your website is looking good by now! It should look something like this:

And the code should look something like this:
index.html
<link rel="stylesheet" href="style.css" />
<meta name="viewport" content="width=device-width, initial-scale=1.0">

<h1>Sokka's Website</h1>
<p>Hi, I'm me. Welcome to my website!</p>

<h2>My Hobbies</h2>
<ul>
    <li>Reading</li>
    <li>Writing</li>
    <li>Petting Cats</li>
</ul>

<h2>A Cool Image</h2>
<img width="200px" src="https://upload.wikimedia.org/wikipedia/commons/5/53/Sheba1.JPG">
style.css
body {
  background: pink;
  color: red;
  font-family: consolas;
  font-size: 18px;
}